How to…
Use Picture Controls
By Becky Danese
A feature that has often been promoted by Nikon is the ability for their range of DSLRs and the Nikon 1 system to process images in-camera while the shot is taken. This is ideal for shooting the vivid hues of Autumn leaves, or toning down harsh contrasts when wanting a natural portrait. Much of what one does in post-processing can actually be done from within the camera itself, and Nikon have offered an entire menu of options for several years now.
Both minor and major adjustments can be made to the colour, saturation, contrast and even overall tone of the photograph. Much like changing your roll of film in the days of 35mm from Black & White to the rich colours of Kodachrome, one can set a digital camera to do the same and even make minor adjustments to these pre-sets if desired.
It is worth noting that Picture Controls applied to RAW files will not affect a resulting photograph when the image is eventually converted unless you use Nikon software to do so. Using other software such as Adobe Lightroom, Photoshop, Aperture or Capture One reverts the RAW file back to its original form when converted. Only Nikon’s own software such as View NX/2, Capture NX/2 and NX-D will maintain these picture controls when converting RAW files. If you use software other than Nikon’s post-process it is worth using the Nikon RAW converter first and then importing your files into Lightroom etc. to keep these adjustments.
If you tend to shoot in JPEG or TIFF all Picture Control settings and in-camera enhancements will be applied to the final photo and will not be able to be ‘removed’ in processing with a click of a button. This is one of the many reasons it is worth shooting in RAW or a combination of RAW + JPEG (a subject covered in Nikon Owner Issue XLIX).
To set the Picture Controls on your camera I would recommend the following steps:
– Access the ‘Set Picture Controls’ menu option via the Shooting Menu on the camera. (fig. 1) For some newer cameras this can also be accessed using a shortcut button the back of the camera.
– Although the range of Picture Controls has increased over the years from a few basic adjustments to a variety, with the Nikon D810 and onwards incorporating a number of entirely new controls previously unavailable, the principles are the same. From this you will be able to select usually one or all of the following options (fig. 3):
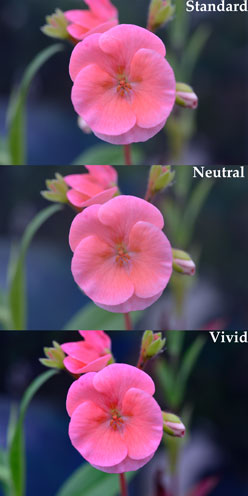
Standard
Standard processing for a balanced effect, usually suitable for most situations.
Neutral
Minimal processing for a natural effect. Colours tend to be less saturated and lower-contrast. Best chosen for photographs that will later be extensively retouched or processed.
Vivid
Pictures are enhanced for a vivid photoprint effect. Colours tend to be more saturated, brighter and slightly warmer. Pictures are also slightly sharpened. Best chosen for photographs that emphasize primary colours.
Monochrome
Convert pictures to Black & White and add filter effects or toning such as Sepia or Cyan. Filter effects can also be added (as in the days of using filters with Black & White film) – YELLOW to optimize contrast for brighter skin tones, ORANGE for stronger contrast in landscapes featuring blue sky, RED for strong contrast with sunny backgrounds, GREEN for brighter greenery and for more restrained tones In skin and lips.
Portrait
Create portraits with soft, natural skin tones.
Landscape
Use for vibrant shots of landscapes and city scapes.
Flat (D810 bodies + onwards)
Ideal for High Dynamic Range shots, this setting evens out colours for maximum dynamic range.
Within each of these Picture Controls one can tweak certain elements in order to get the exact final product you are looking for, and save these as ‘profiles’ in your camera.
To make your own custom Picture Control profile in-camera, access the Manage Picture Control item from the Shooting Menu (fig. 1). Access the Save/edit option (fig. 4) and choose from one of the above Picture Controls to use as your ‘template’. You will then be able to adjust the following settings:
Sharpening
Contrast
Brightness
Saturation
Hue
Clarity (newly employed for the D810 and newer models, the clearness of your photo can be adjusted)
When you make adjustments to any of these settings, a small underscore will highlight the point you have moved from in case you would like to revert back to the original settings.
Once you are happy with your adjustments you can save this profile by pressing OK and then giving it an appropriate title (fig. 5 & 3).
Nikon’s Picture Control Utility 2 also allows you to create your own Picture Control profiles and import these into your camera or automatically apply this to your RAW files when uploaded. Both the Nikon D810 and Picture Control Utility 2 allow you to adjust in smaller increments (0.25 in all cases except Brightness), which will no doubt be prevalent in later cameras and versions of the software. Most current and earlier cameras move in increments of a fairly arbitrary 1.00, which assumes that future bodies and software will allow for more minute adjustments.
These settings allow one to produce a completely unique look and feel to photographs, putting creative control into the hands of the photographer throughout the shooting process by making adjustments to suit your photographic situation, rather than leaving the creativity to editing done in front of a computer after the shot has been taken.
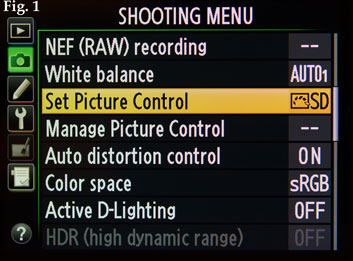
Fig. 1: ‘Set Picture Control’ and below it ‘Manage Picture Control’ can be found in the shooting menu.
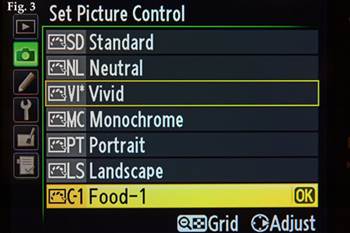
Fig. 3: When you have made changes to a pre-set Picture Control an asterisk (*) will appear next to the title.
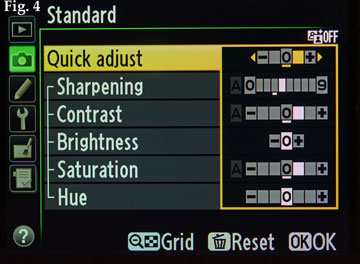
Fig. 4: An underscore ( _ ) will appear when you modify a pre-set to show where you have moved it from.
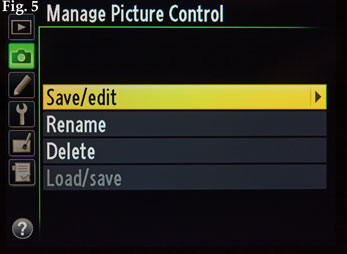
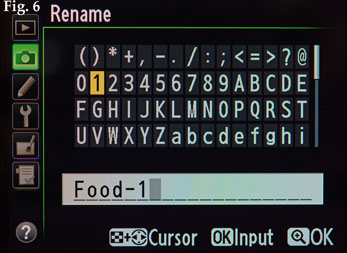
Fig. 6: Most DSLRs will let you save up to 9 different custom Picture Controls.